Switch破解,NANO_NEO做加载工具
前言
-
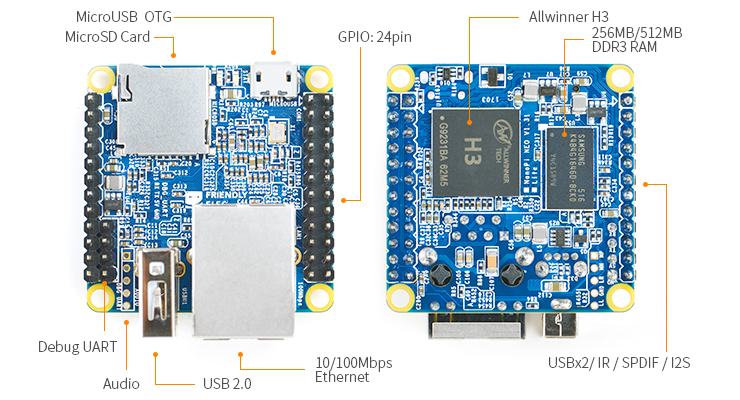
由于要做一个switch破解的playload加载工具,所有拿手的nano_neo做一个加载器。但是呢,苦逼的我是手机苹果,电脑苹果,为了外出方面就折腾一下现有资源,switch只支持xhci(usb3.0协议),手头上的M1和NEO自带的系统都不支持,必须自己编译一个打了usb兼容补丁的内核,所以才有如下事情。另外,在谷歌也看到老外直接用树莓派去做这个,也有成品镜像的。 需要交流或者现成Neo镜像的可以发邮件,另外其他硬件编译提交有偿服务 199699394@qq.com。
-
某宝自己搜索吧。价钱和pip0差不多

-
官方编译参考: http://wiki.friendlyarm.com/wiki/index.php/Mainline_U-boot_and_Linux/zh
-
Linux内核(友善之臂提供):https://github.com/friendlyarm/linux.git
-
switch补丁(补丁文件在根目录:linux-ehci-enable-large-ctl-xfers.patch): https://gitee.com/raychow-github/shofel2
-
switch加载器(这个加载器我稍微修改了一下,上面的playload.bin为5.1系统使用):https://gitee.com/raychow-github/fusee-launcher
交叉编译 nanopi 模拟xchi
环境配置
-
我是在docker上配置编译的,其他人也可以用虚拟机之类,配置环境。这个是64位的ubuntu镜像,本农选 ssh镜像,理论上,应该都支持编译的,然后自己按友善wiki构建编译环境的。
-
命令如下:(建议所有路径都不要改,反正在docker里面,大不了删了重建,这个如果不按路径,好似有点坑):
mkdir -p /opt/FriendlyARM/toolchain


tar xf arm-cortexa9-linux-gnueabihf-4.9.3.tar.xz -C /opt/FriendlyARM/toolchain/


export PATH=/opt/FriendlyARM/toolchain/4.9.3/bin:$PATH


export GCC_COLORS=auto


//验证环境(这里不报错就可以了)

arm-linux-gcc -v
真实编译
- 为switch打USB补丁,在指定的linux内核驱动的文件上注释如下代码
//路径:

/drivers/usb/host/ehci-hcd.c


//代码(需要注释):

-	case PIPE_CONTROL:

-		/* qh_completions() code doesn't handle all the fault cases

-		 * in multi-TD control transfers.  Even 1KB is rare anyway.

-		 */

-		if (urb->transfer_buffer_length > (16 * 1024))

-			return -EMSGSIZE;

-		/* FALLTHROUGH */

-	/* case PIPE_BULK: */
-
开始编译(这里基本上和友善wiki上的差别不大)
-
主要一下,本农是先在tf卡写入一个原版镜像,等于免去了重新再编译一次u-boot.
-
tf卡镜像路径,如下
tf(根目录)/boot/

tf(根目录)/rootfs/
- 内核路径,如下
//这个是github上的,下载速度可能会慢

git clone https://github.com/friendlyarm/linux.git -b sunxi-4.14.y --depth 1


//这个是我fork下来的,在码云上的速度很快,这来我还没打补丁

git clone https://gitee.com/raychow-github/linux.git -b sunxi-4.14.y --depth 1


cd linux


touch .scmversion


make sunxi_defconfig ARCH=arm CROSS_COMPILE=arm-linux-


//这步耗时较长

make zImage dtbs ARCH=arm CROSS_COMPILE=arm-linux-


//复制文件到tf卡,需要将tf挂在到docker上,怎么挂自己想办法吧,本农的docker是挂在在群晖上的,插U盘直接识别。

cp arch/arm/boot/zImage (tf卡挂在目录)/boot/

cp arch/arm/boot/dts/sun8i-*-nanopi-*.dtb (tf卡挂在目录)/boot/


//这步耗时较长 编译和更新驱动模块

cd linux

make modules ARCH=arm CROSS_COMPILE=arm-linux-


//更新SD卡上rootfs的驱动模块

cd linux

make modules_install INSTALL_MOD_PATH=/(tf卡挂在目录)/rootfs/ ARCH=arm CROSS_COMPILE=arm-linux-
- 到这来基本大工告成了!!!感谢!!
配置自动启动
配置加载器运行环境
apt-get update


apt-get upgrade


apt-get install python3 python3-pip libusb-1.0-0-dev python3-usb
测试启动器
-
这个启动器我在原版上注释了几行,校验xchi的处理。
-
根目录下的Nintendo_LayeredFS_Tool.zip,5.1版本所有LayeredFS破解的工具整合。使用教程(感谢“追夢de尐朙”提供教程)https://tieba.baidu.com/p/5749249476
git clone https://gitee.com/raychow-github/fusee-launcher


//测试 (记得重启的时候走正常短接流程)

cd fusee-launcher/

./fusee-launcher.py  -w payload_5.1.bin
//测试成功,这是swith进入playload模式控制台的log


root@NanoPi-NEO:/home/soft/fusee-launcher# ./fusee-launcher.py  -w payload_5.1.bin

Waiting for a TegraRCM device to come online...


Important note: on desktop Linux systems, we currently require an XHCI host controller.

A good way to ensure you're likely using an XHCI backend is to plug your

device into a blue 'USB 3' port.


Identified a Linux system; setting up the appropriate backend.

Found a Tegra with Device ID: b'aaaaaaaa'


Setting ourselves up to smash the stack...

Uploading payload...

Smashing the stack...

The USB device stopped responding-- sure smells like we've smashed its stack. :)

Launch complete!
开机自启动配置
- 在这个文件,增加启动脚本 (脚本路径要看实际情况)
//路径

/etc/rc.local


//增加

bash /home/soft/switch_launcher_always.sh
- 脚本switch_launcher_always.sh (脚本路径要看实际情况)
#!/bin/sh -e


while true; do

    /home/soft/fusee-launcher/fusee-launcher.py -w /home/soft/fusee-launcher/payload_5.1.bin

done


exit 0
